Dev Daily Plugin
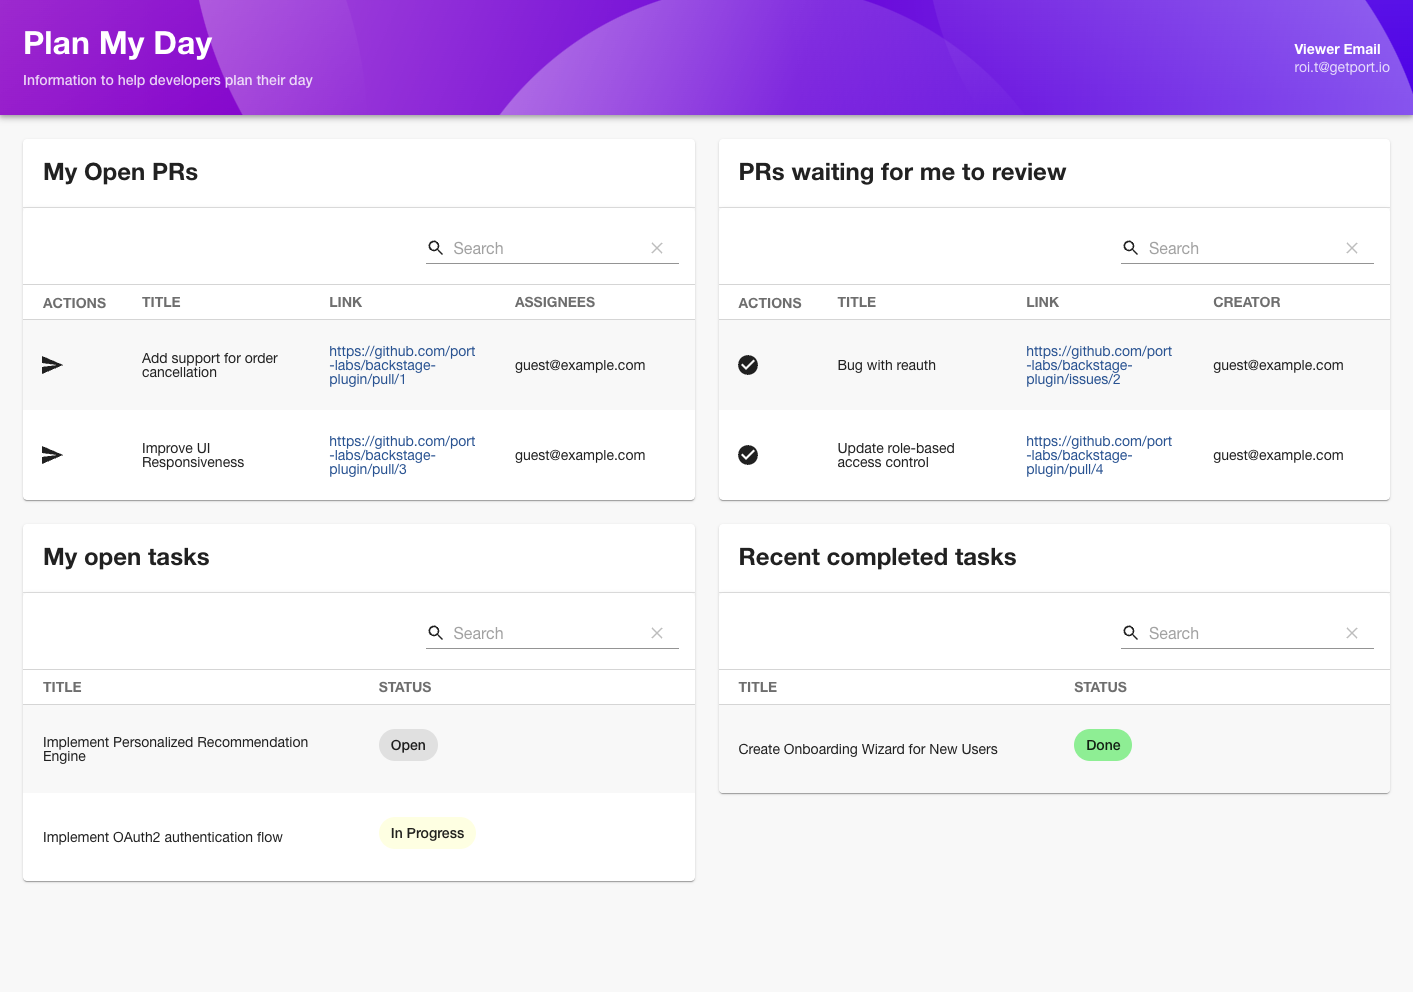
The Dev Daily Plugin provides developers with a consolidated dashboard of their daily development activities, including pull requests, tasks, and reviews. This plugin helps developers efficiently plan and manage their day by bringing together key information in one place.
Prerequisites
- Complete the Getting Started guide
- Jira and Github accounts with the necessary permissions
- For Jira obtain a API Token
Setup integrations
In your Backstage instance, click the Settings button on the bottom left and click on the Port tab.
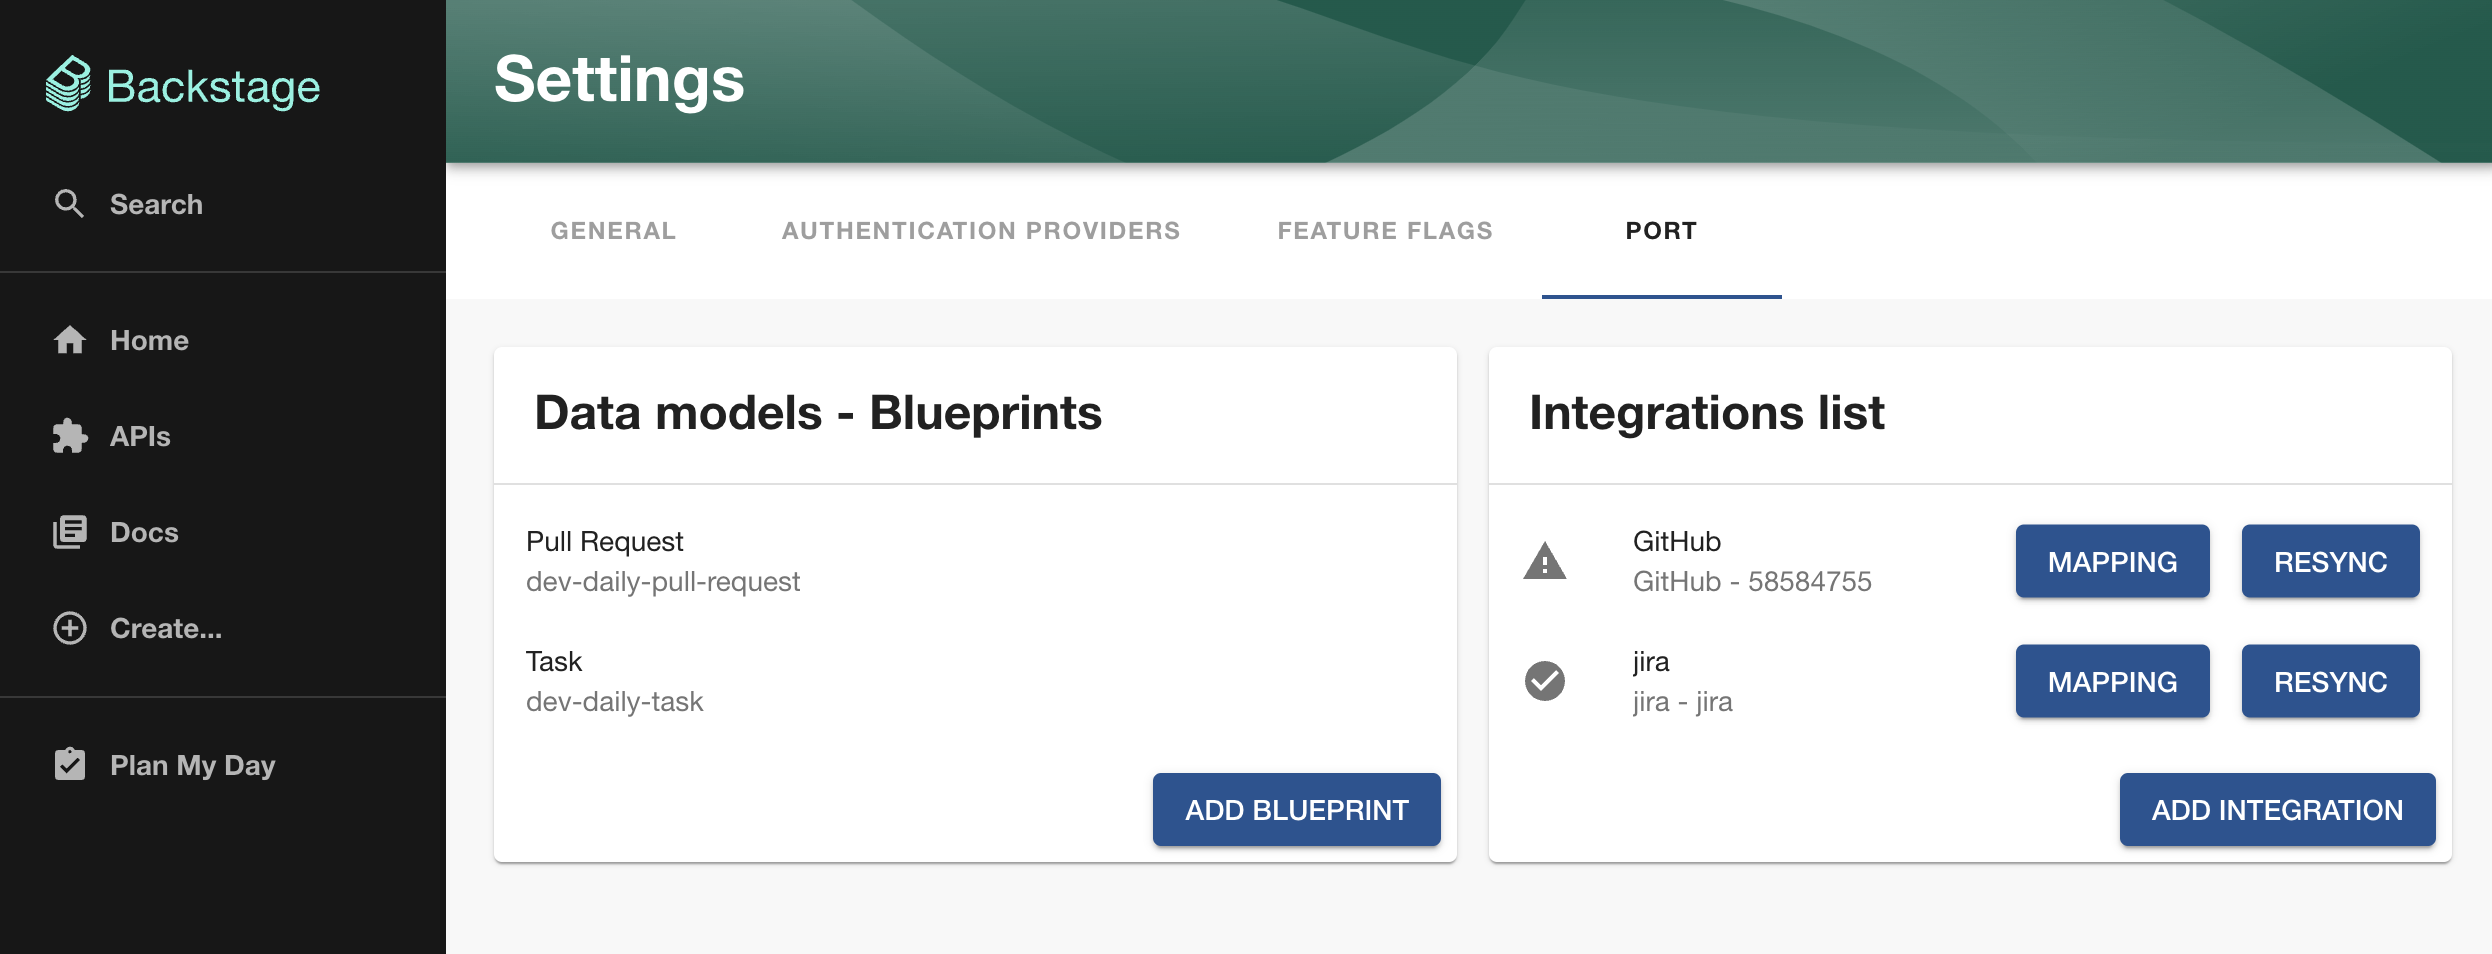
Yours will be empty, so you'll need to add your Jira and Github integrations.
Click on the Add Integration button, and follow the instructions to add both Jira and Github integrations.
Install GitHub Integration
- In your Backstage instance, click the Settings button on the bottom left and click on the Port tab.
- Click on the Add Integration button, in the settings page.
- In the Git Providers section, click on the GitHub button.
- Follow the instructions to install the GitHub app on your GitHub account.
Read more about Port's GitHub integration here.
Install Jira Integration
- First, obtain a API Token for the atlassian account you want to use to authenticate with Jira.
- In your Backstage instance, click the Settings button on the bottom left and click on the Port tab.
- Click on the Add Integration button, in the settings page.
- Scroll down to Project Management and select Jira.
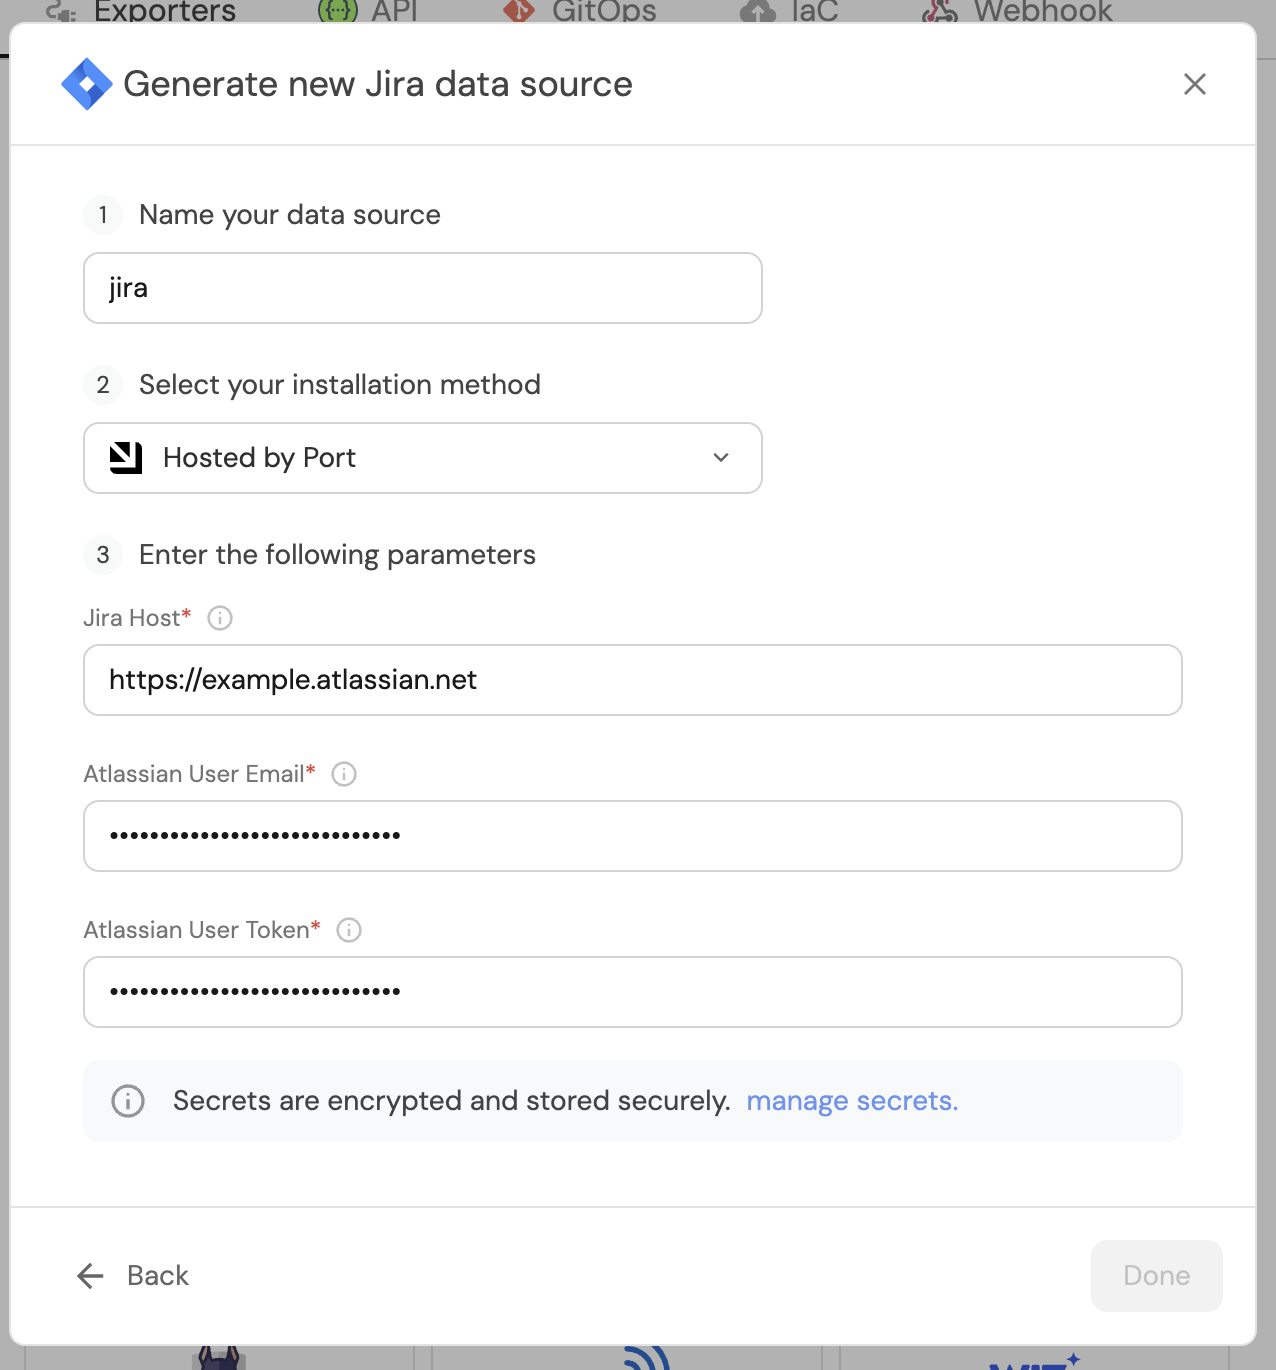
- Fill out the form:
- Name: Give your integration a name. (You can pick "jira")
- Installation Method: Select Hosted by Port. For more advanced setups, read here
- Jira Host: Usually it's
https://<your-jira-instance>.atlassian.net/. - Atlassian User Email: The email of the user you want to use to authenticate with Jira.
- Atlassian API Token: The API Token you obtained for the user.
- Click on the Save button.
Read more about Port's Jira integration here.
Setup the mappings & blueprints
In your Backstage instance, click the Settings button on the bottom left and click on the Port tab.
Add the blueprints - Pull Request & Task
Click on Add Blueprint and add the following two blueprints:
Pull Request Blueprint
{
  "identifier": "dev-daily-pull-request",
  "title": "Pull Request",
  "icon": "Github",
  "schema": {
    "properties": {
      "creator": {
        "title": "Creator",
        "type": "string"
      },
      "assignees": {
        "title": "Assignees",
        "type": "array"
      },
      "reviewers": {
        "title": "Reviewers",
        "type": "array"
      },
      "status": {
        "title": "Status",
        "type": "string",
        "enum": ["merged", "open", "closed"],
        "enumColors": {
          "merged": "purple",
          "open": "green",
          "closed": "red"
        }
      },
      "closedAt": {
        "title": "Closed At",
        "type": "string",
        "format": "date-time"
      },
      "updatedAt": {
        "title": "Updated At",
        "type": "string",
        "format": "date-time"
      },
      "mergedAt": {
        "title": "Merged At",
        "type": "string",
        "format": "date-time"
      },
      "link": {
        "format": "url",
        "type": "string"
      }
    },
    "required": []
  },
  "mirrorProperties": {},
  "calculationProperties": {},
  "aggregationProperties": {},
  "relations": {}
}
Task Blueprint
{
  "identifier": "dev-daily-task",
  "title": "Task",
  "icon": "Jira",
  "schema": {
    "properties": {
      "assignee": {
        "type": "string",
        "title": "Assignee"
      },
      "status": {
        "icon": "DefaultProperty",
        "title": "Status",
        "type": "string",
        "enum": ["To Do", "In Progress", "Done"],
        "enumColors": {
          "To Do": "turquoise",
          "In Progress": "yellow",
          "Done": "green"
        }
      },
      "link": {
        "type": "string",
        "title": "Link",
        "format": "url"
      }
    },
    "required": ["assignee", "status", "link"]
  },
  "mirrorProperties": {},
  "calculationProperties": {},
  "aggregationProperties": {},
  "relations": {}
}
Add the mappings
Click on the MAPPING button near the GitHub integration. and paste the following YAML:
Pull Request Mapping
resources:
  - kind: pull-request
    selector:
      query: "true"
    port:
      entity:
        mappings:
          identifier: .head.repo.name + (.id|tostring)
          title: .title
          blueprint: '"dev-daily-pull-request"'
          properties:
            creator: .user.login
            assignees: "[.assignees[].login]"
            reviewers: "[.requested_reviewers[].login]"
            status: .status
            closedAt: .closed_at
            updatedAt: .updated_at
            mergedAt: .merged_at
            prNumber: .id
            link: .html_url
Now click on the MAPPING button near the Jira integration. and paste the following YAML:
Task Mapping
The jql query (in line 8) is used to filter the issues that will be mapped to the blueprint.
Feel free to change it to your needs. in this example we are mapping issues that were created or updated in the last 3 weeks.
deleteDependentEntities: true
createMissingRelatedEntities: true
enableMergeEntity: true
resources:
  - kind: issue
    selector:
      query: "true"
      jql: (created >= -3w) OR (updated >= -3w)
    port:
      entity:
        mappings:
          identifier: .key
          title: .fields.summary
          blueprint: '"dev-daily-task"'
          properties:
            link: (.self | split("/") | .[:3] | join("/")) + "/browse/" + .key
            status: .fields.status.statusCategory.name
            creator: .fields.creator.emailAddress
            created: .fields.created
            updated: .fields.updated
            resolutionDate: .fields.resolutiondate
            assignee: .fields.assignee.emailAddress
If you already have a mapping configured you should append the new mapping to the existing one.
Install the plugin
yarn --cwd packages/app add @port-labs/backstage-plugin-dev-daily
Next, add the DevDailyPage component to your Backstage instance.
In the file packages/app/src/App.tsx, add the route:
import { DevDailyPluginPage } from "@port-labs/backstage-plugin-dev-daily";
// ...
<Route path="/dev-daily" element={<DevDailyPluginPage />} />;
Then add the link to the NavBar, in the file: packages/app/src/components/Root/Root.tsx:
import AssignmentTurnedInIcon from "@material-ui/icons/AssignmentTurnedIn";
// ...
<SidebarItem icon={AssignmentTurnedInIcon} to="dev-daily" text="Plan My Day" />;
See the plugin in action
You might need to wait 5-10 minutes for the integration setup to complete before you see the data in the plugin.
Troubleshooting
If you don't see the data in the plugin, you can check the following:
- Check if the integration setup is complete.
- Login to Port dashboard, and check data sources page.
- You will see a green checkmark next to the integration name.
- It could be that the plugin does not recognize the user you are logged in with.
- Check on the top right corner of the page, under the Viewer email if the user is logged in with the correct account.